Hydrotechnik force sensor
Force sensor ←HYDROTECHNIK
hydrotechnik
Hydrotechnik overview of Force sensor
 |
Force sensor FO110/FO210 |
| Hydrotechnik in china | |
| Force sensor FO110/FO210 data download | |
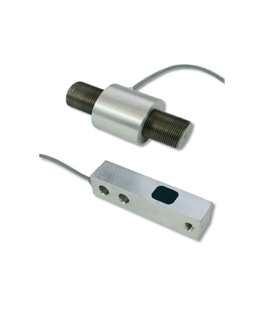
The deflecting beam principle (shear force sensor): Since a force and the defl ection of a beam is proportional, this hydrotechnik sensor is able to determine a force by measuring its elongation or change in length.Due to its compact design, these hydrotechnik traction-pressure force sensors can be used in the Hydrotechnik Traction force sensor: The force sensor works to the principle of center-line force measurement. You can record traction forces at lifts, cranes and housings, or twistings of masts, towers or platforms.The hydrotechnik force sensor is a threaded rod. This allows easy and universal fastening. The application chamber for the resistance strain gauge is protected from mechanical and chemical damage |
|
Hydrotechnik's technical data of force sensor
| Hydrotechnik force sensor technical data | |
| Measuring principle | flexural beam |
| Output signal | 4 ... 20 mA |
| Electrical measuring connector | 5 pole device connector, M16 x 0.75 |
| Protection type (EN 60529 / IEC 529) | IP 65 |
| Material casing | steel |
| Hydrotechnik force sensor Signal type | three wires |
| Supply voltage Ub | 10 ... 24 VDC |
| Current consumption | max. 40 mA |
| Error limit | < 0.5 % of fi nal value |
| Temperature error NP | < ± 0.04 % of fi nal value / K |
| Temperature error receiver | < ± 0.04 % of measuring range / K |
| Non-linearity | < ± 0.15 % of fi nal value |
| Hydrotechnik force sensor Hysterese | max. 0.1 % of fi nal value |
| Calibration in | N |
| Calibration tolerance | < 0.25 % of fi nal value |
| Environmental temperature | -15 ... +85 °C |
| Storage temperature | -15 ... +85 °C |
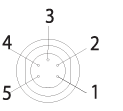
Hydrotechnik force sensor Electrical connector
| Pin assignment | 4 ... 20 mA output |
 |
Pin 1 = signal + |
| Pin 2 = – Ub / signal – | |
| Pin 3 = + Ub | |
| Pin 4 = free | |
| Pin 5 = shield |
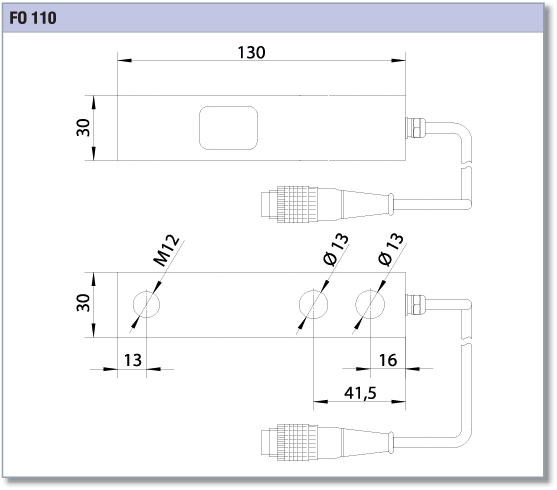
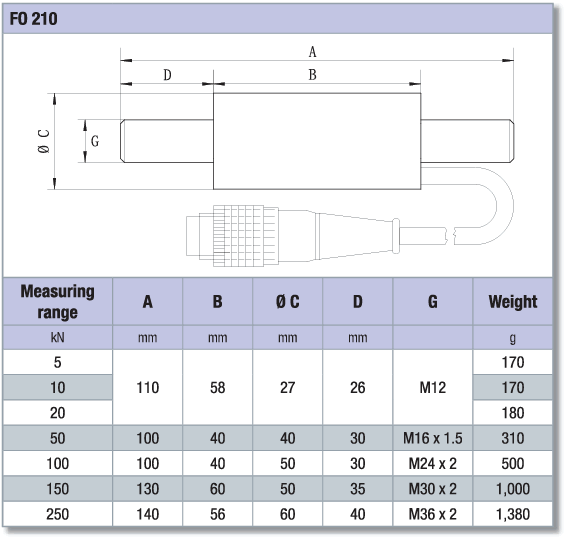
Hydrotechnik force sensor dimensions


Hydrotechnik shear force sensor FO110 order number
| Measuring range | Overload capability |
Breaking load | Material | Weight | Order number |
| kN | of nominal value | of nominal value | g | ||
| 0 ... 1.0 | 100 % | 600 % | aluminium | ~ 350 | 3183-4G-01.37 |
| 0 ... 1.5 | 50 % | 400 % | 3183-4G-02.37 | ||
| 0 ... 2.0 | 50 % | 400 % | 3183-4G-03.37 | ||
| 0 ... 5.0 | 100 % | 600 % | steel | ~ 750 | 3183-4G-04.37 |
| 0 ... 10.0 | 50 % | 400 % | 3183-4G-05.37 | ||
| 0 ... 20.0 | 50 % | 400 % | 3183-4G-06.37 |
Hydrotechnik Traction force sensor FO210 order number
| Measuring range | Overload capability |
Breaking load | Order number |
| kN | of nominal value | of nominal value | |
| 0 ... 5 | 100 % | 500 % | 3183-41-01.37 |
| 0 ... 10 | 50 % | 500 % | 3183-41-02.37 |
| 0 ... 20 | 50 % | 400 % | 3183-41-03.37 |
| 0 ... 50 | 50 % | 400 % | 3183-41-04.37 |
| 0 ... 100 | 50 % | 400 % | 3183-41-05.37 |
| 0 ... 150 | 50 % | 400 % | 3183-41-07.37 |
| 0 ... 250 | 50 % | 400 % | 3183-41-06.37 |